Tuesday, December 19, 2017

Winter Gnomes and New Beginnings

Link to tutorial: http://rainydaycraftess.blogspot.com/2017/02/holiday-gnomes.html
Last year, I went through a bit of a mid-life 'Christmas Crisis'. There was a lot more to it then that. Not anything religious. I love Christmas. I love the traditions. I love celebrating the birth of Christ. In fact, it wasn't Christmas itself, it's just when it hit. I needed something different. I was kind of stuck in a rut.

Life on a daily basis had become just the essentials; work, sleep, exercise, physical and spiritual nourishment and family time. While all of these were important, I was burning myself out. While I was at my in-laws for Christmas, a very good place for me to be, because it forces me to slow down, I saw these DIY gnomes. I got really excited about making them. It must have rubbed off because I enlisted all of my sisters (in-law) to go in on it with me and we made sets for all of us. It was so much fun! That was the beginning of it. 

Not long after, I was called to Jury Duty, spending hours waiting. That's when I started my Rainy Day Craftess Instagram account and the blog. It was a fun way to share what I've created and give and get ideas.


It's crazy to look back at this year and see how many crafts I've made. They span over a large genre from wreaths to wall decor to banners to t-shirts to pillows to ornaments to wood burning. I think I will end up settling down with a few but it's fun trying it all.

I've been happier, more relaxed and more energized this year. My husband has noticed the difference and has been wonderfully supportive, to the point the I have to be the one to say, "no more investing [money]" because he's thinks (knows) it's worth the mental health to financially support the hobby!

Last year at Christmas, I wanted to get rid of all our Christmas decorations and just start over. Everything seemed so dark and gloomy. We didn't. (Well, I did pass our stockings and a few things on to my sweet sis who really wanted them and could use them but for the most part, I just added on and switched up). I love our decorations this year and I'm excited about the ones were giving as gifts and helping others with as well. It's been exciting and I'm looking forward to another year!

Wednesday, December 13, 2017

Ribbon Christmas Tree Ornaments


This last month, at our Crafting Saturday afternoon, I learned how to make Christmas Tree Ornaments. Oh my goodness, let me tell you, once you get the hang of it, they are cost efficient, super easy and fun!

Supplies per Ribbon Tree:

Needle
Thread
Scissors
Fine-tip Sharpie
16" Ribbon
2 seed beads*
10 trunk beads**
(also if you have it, fray stay fabric glue)

 *Your small beads
**Your larger beads

Here is a step-by-step process:

Thread your needle, you want it double with a knot at the end.


Take your ribbon and mark a dot 2.75" from the end.


If you want to make more than one at a time, lay the ribbons next to each other, following the same pattern...


Mark along the way as follows:

2.75"(first mark)
2.5"
2.25"
2.0"
1.75"
1.5"
1.25"
1.0"
.75" (last mark)


Take your threaded needle. Thread it through the trunk bead, then the seed bead, loop it around and back through the trunk bead (or you can just tie a big knot and thread it through the seed and then the trunk bead).


Thread it through the first black dot on the ribbon (this was the one marked at the 2.75" mark). Thread a bead on it.


Fold the ribbon down (making sure it doesn't twist), thread it through the next black dot (2.5" mark). Thread another bead.


Continue back and forth until you reach the top. Finish by threading the needle through a seed bead. Pull all beads down making sure the string is tight throughout the ribbon tree.


Thread back down into the trunk bead and loop back up again.


Finish off by tying it off near the seed bead and then at the top, allowing a loop so it can be hung.


... And there it is! Just trim off the top and bottom and add fray sealant depending on the ribbon. The trickiest part is the knots but they can be done in different ways so there's room for error.


Merry Christmas!

Saturday, December 9, 2017

Stocking Hanger Plaque

I wanted to use our fireplace for our banner and I didn't want to nail the stockings into the wall, so I created a stocking hanger plaque for the wall. I also love the antique look so it allowed me the flexibility to create the look I wanted. You can find these knobs at various places including Home Goods and Pier 1. 


After my sweet husband, with his assistant, cut it, I painted the board, this one was pine, since it is a lighter wood. Once it was dry, I sanded down the edges with a courser sand paper.


I measured 5 inches between each knob (the board was 30" total)


I then cut vinyl and place it above the pencil points for the knobs.


My husband used his dremel to drill holes and screwed the knobs in and then shortened the backs to the edge of the wood. He then nailed on mounting brackets.


Our stockings are now ready to go! One for each of us and for our dog Willa too!


Christmas Party Decorations


My friend was part of a board over decorations for a Christmas party. She enlisted our help to make wooden trees and arrange the floral for the centerpieces. It was quite an undertaking. Here are some pictures from our projects:


Friday, November 10, 2017

Christmas Ornaments 2017

This Christmas, we (my husband with his wonderful wood working skills) and I, are pleased to be offering two types of Christmas ornaments and a beautiful Christmas crate gift box to present them in.

All Ornaments are $5 a piece (with or without bow) and right now we are only offering locally. That limits us quite a bit but I'm still working full time and am a mommy so it works best for us right now this way.

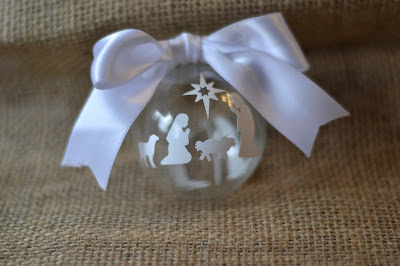
Nativity

This is an original image that I have created and each ornament is slightly unique. We offer the following colors: Dark Blue, Cherry Red, Berry Red, Green, Silver, White and Black. You can order it with a large white ribbon, a smaller white or blue ribbon or no ribbon, whatever your preference is (no extra charge).

Berry Red with Large White Ribbon 


White

Cherry Red

Dark Blue with No Ribbon
Green

Silver with Small Blue Ribbon

Personalized Snowflake

These ornaments are also unique and make the perfect personalized gifts. We offer the following colors: Dark Blue, Cherry Red, Berry Red, Green, Silver, White and Black. You can order it with a big white ribbon, a smaller white or blue ribbon or no ribbon, whatever your preference is (no extra charge).


Crates


Crates come in 3 sizes

$8 for the small (holds 2 ornaments)

$10 for the medium (holds 4 ornaments)

$12 for the large (holds 6 ornaments)

Please email me with requests: angebendixsen@gmail.com

Tuesday, October 24, 2017

Ghost Chili


One of my favorite recipes to have at my Halloween Parties is Ghost Chili. I got the original recipe from a friend and then changed some things here and there over the years. One of the things I love about this recipe is that the longer it sits, the better it tastes, so if you make it the day before, all you have to do is warm it up and the flavors are perfect.


Ghost Chili


Ingredients

1 lb chicken
1 drained can garbanzo beans
2 cans of diced green chili

2 large cans of white hominy
4 teaspoons of chicken broth paste
Half a diced onion
2 crushed/dice cloves of garlic
2 teaspoons of cumin
2 teaspoons of chili powder
Dash of cayenne pepper
6 oz shredded white cheddar cheese
Cubed block of cream cheese


Directions

Sautee garlic and onion with a little bit of olive oil or butter until the onion is turning golden brown. Add the liquid from the hominy cans and broth paste. Simmer on low, adding in spices (cumin, chili powder and cayenne). Once it starts to dissolve, add in all cans of beans and chili. Add in cubed chicken, shredded cheese, cubed cream cheese. Keep on low, stirring occasionally for one-two hours. If you choose to eat it the next day, you can also put it in a crock pot and let it sit on "warm" throughout the day. Hope you enjoy it as much as we do and Happy Halloween!